Active Directory Federation Services 2016 (ADFS 2016)
Initial setup
Prerequisites
1. A fully installed and operational AD FS 2016 server
You must have AD FS 2016 (4.0) fully installed and running as an Identity Provider. This includes having valid certificates installed, and having the AD FS server connected to your Active Directory domain. These instructions do not cover setting up AD FS itself or installing certificates, however there are several guides published on the Internet. Note that if you use 12 month certificates you will need to update them every year and follow the instructions at the bottom of this article to update the Skills Base configuration accordingly.
2. A local Skills Base Administrator account
You will require a local Administrator account in Skills Base. A local account has a local password stored within Skills Base and so can be accessed even when Single Sign On services are unavailable. This is important in case the SSO integration breaks and you become unable to log in via Single Sign On. Note that a local account can also be accessed via SSO as long as the email address in Skills Base exactly matches that in your IdP.
Step 1 - Configure Skills Base SSO (Part 1)
- Log in to Skills Base as an Administrator
- From the left side of menu, select [Administration > Authentication]
- On the Authentication page in the Identity Providers section, select Add identity provider.
- Click Add to use the default settings.
- In the Application Details panel, next to SAML SP Metadata, select Download XML File and save the resulting file on your computer.
Step 2 - Set up a Relying Party Trust in AD FS
In this step we provide your AD FS server with the information it needs about Skills Base by using the Service Provider metadata file that we downloaded in step 1.
- Under AD FS click the "Relying Party Trusts" folder
- In the "Actions" list on the right-hand side, click "Add Relying Party Trust"
- Select "Claims aware"
- Select "Import data about the relying party from a file"
- Select the metadata file you downloaded from Skills Base in the previous step
- You may receive a warning stating "Some of the content in the federation metadata was skipped because it is not supported by AD FS". It's safe to ignore this warning.
- For "Display Name" enter "skills-base.com"
- Choose an appropriate access control policy based on the needs of your organization and complete the wizard.
- Ensure "Configure claims issuance policy for this application" is ticked and click "Close"
Step 3 - Edit the Claim Rules
Here we define claim rules that detail the attributes that are required by Skills Base and which must be provided by AD FS upon each sign on.
In the "Edit Claim Issuance Policy" window for the Relying Party Trust that you just added we will create two rules:
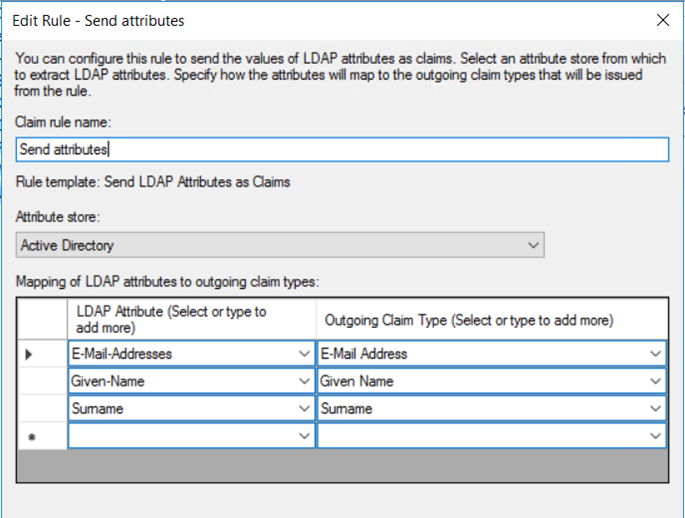
Rule #1: “Send attributes”
This rule will instruct AD FS to send the three required attributes (Email, First Name, Last Name) to Skills Base.
- Click "Add rule"
- Select "Send LDAP Attributes as Claims"
- For "Claim rule name" enter "Send attributes"
- For "Attribute store" select "Active Directory"
- Set the mapping table as follows and then click "Ok":
| LDAP Attribute | Outgoing Claim type |
| E-Mail-Addresses | E-Mail Address |
| Given-Name | Given Name |
| Surname | Surname |
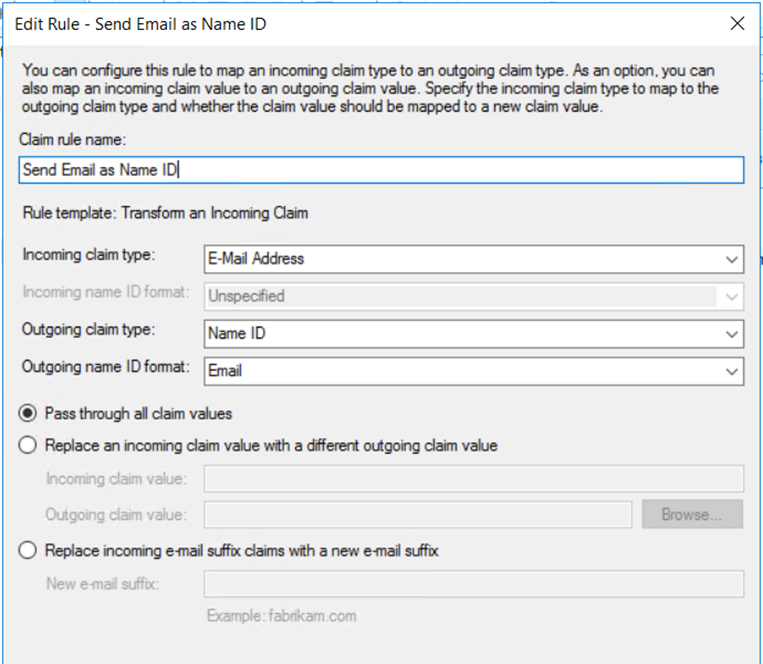
Rule #2: “Send Email as Name ID”
This rule instructs AD FS to use the user’s email address as the SAML Name ID.
- Click "Add rule" again
- Select "Transform an incoming claim"
- For "Claim rule name" enter "Send Email as Name ID"
- For "Incoming claim type" select “E-Mail Address”
- For "Outgoing claim type" select "Name ID"
- For "Outgoing name ID format" select "Email"
- Click "Finish"
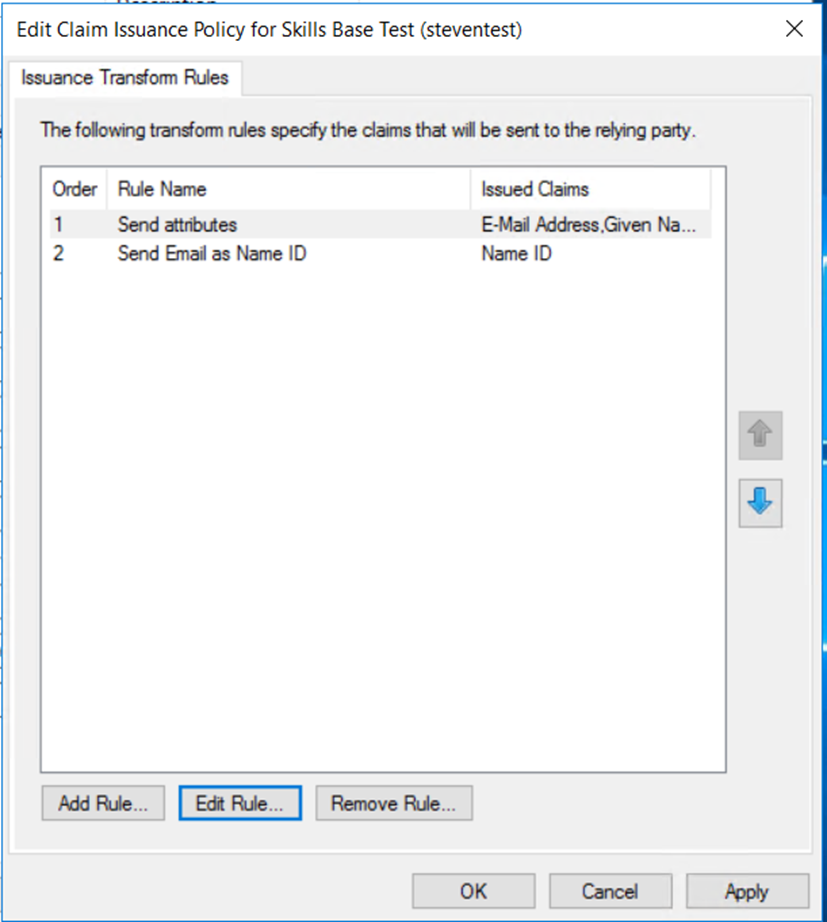
Important
After creating both of these rules, ensure they are in the correct order in the “Issuance Transform Rules” tab, with Rule #1 above appearing first, and Rule #2 above appearing second in the list.
Step 4 - Download your AD FS IdP metadata file
We need to now download the Identity Provider metadata file from your AD FS server which contains all of the information that Skills Base needs to know about your AD FS server.
Your metatdata file is generally available by opening a web browser and appending the following after your AD FS domain:
/federationmetadata/2007-06/federationmetadata.xml
For example: https://adfs.example.com/federationmetadata/2007-06/federationmetadata.xml
Note that you must use https to access this, and not http. Once you have the file, save it somewhere for use in the next step.
Step 5 - Configure Skills Base SSO (Part 2)
- Return to Skills Base and select [Administration > Authentication] from the left hand menu.
- In the Identity Providers section, select the edit button (denoted by a pencil icon) for the Identity Provider record you added.
- In the Edit identity provider panel, for SAML IdP Metadata select Upload an XML file
- Click Browse to choose a file. Select the Federation Metadata XML file that you downloaded from AD FS and click Save.
- In the Authentication panel, for Single Sign-On select the Identity Provider you added
- Make sure the option to bypass the Skills Base login screen is deselcted for now. You can enable this option later, once the integration is proved to be working.
- If you would like to enable Just In Time user provisioning, enable the Automatic user account provisioning option.
- click Save changes.
The Identity Provider you added in the Identity Providers panel should now have a green Enabled badge in the Status column.
Step 6 - Test
The integration is set up. Now it's time to test it.
- Log into Skills Base using your shortcut link. You should be redirected to your AD FS server and presented with an authentication prompt.
- Log in using your organizational Active Directory credentials
Troubleshooting
If an AD FS page displays an error
If you are receiving an error message from your AD FS server, you can check the AD FS error log by:
- Opening the Windows Event Viewer on the AD FS machine
- Expand "Applications and Services logs"
- Expand "AD FS"
- View the "Admin" log.
If a Skills Base page displays an error
Please read the notes about your server's clock on the Single Sign On page if you receive one of the following errors from Skills Base:
- "Received an assertion that is valid in the future. Check clock synchronization on IdP and SP."
- "Received an assertion that has expired. Check clock synchronization on IdP and SP."
- "Received an assertion with a session that has expired. Check clock synchronization on IdP and SP."
Updating the configuration
Occasionally it will be necessary to update the configuration either on the AD FS side, or the Skills Base side. Either way, if one needs to be updated, both do as they are completely dependent. The most common need to update configuration is when certificates are renewed.
For step-by-step instructions on updating the configuration, see: Updating AD FS configuration